Open sourcing enlarger negative carriers

Like many people who are easily interested in cool toys, I have a nasty habit of collecting expensive hobbies. One of these hobbies is of course photography, which can be as cheap or as pricy as you want it to be, but unfortunately the things I'm interested in tend to be expensive. Another hobby I have is 3D printing, something I picked up in the middle of the pandemic, originally to make enclosures for my electronics projects, but later became a way for me to print little toys and trinkets for the kids at the emergency childcare facility I worked at at the time. That was a very stressful, depressing time that I could probably write a book about. Shout out to Make Anything's Tippi Tree for literally saving the kids' and my own sanity for so many hours during the 2020-2021 school year.
So, what better way to combine two of my expensive hobbies than to 3D print inexpensive versions of expensive photography equipment?
The Negatives of Carriers
The Carriers of Negatives
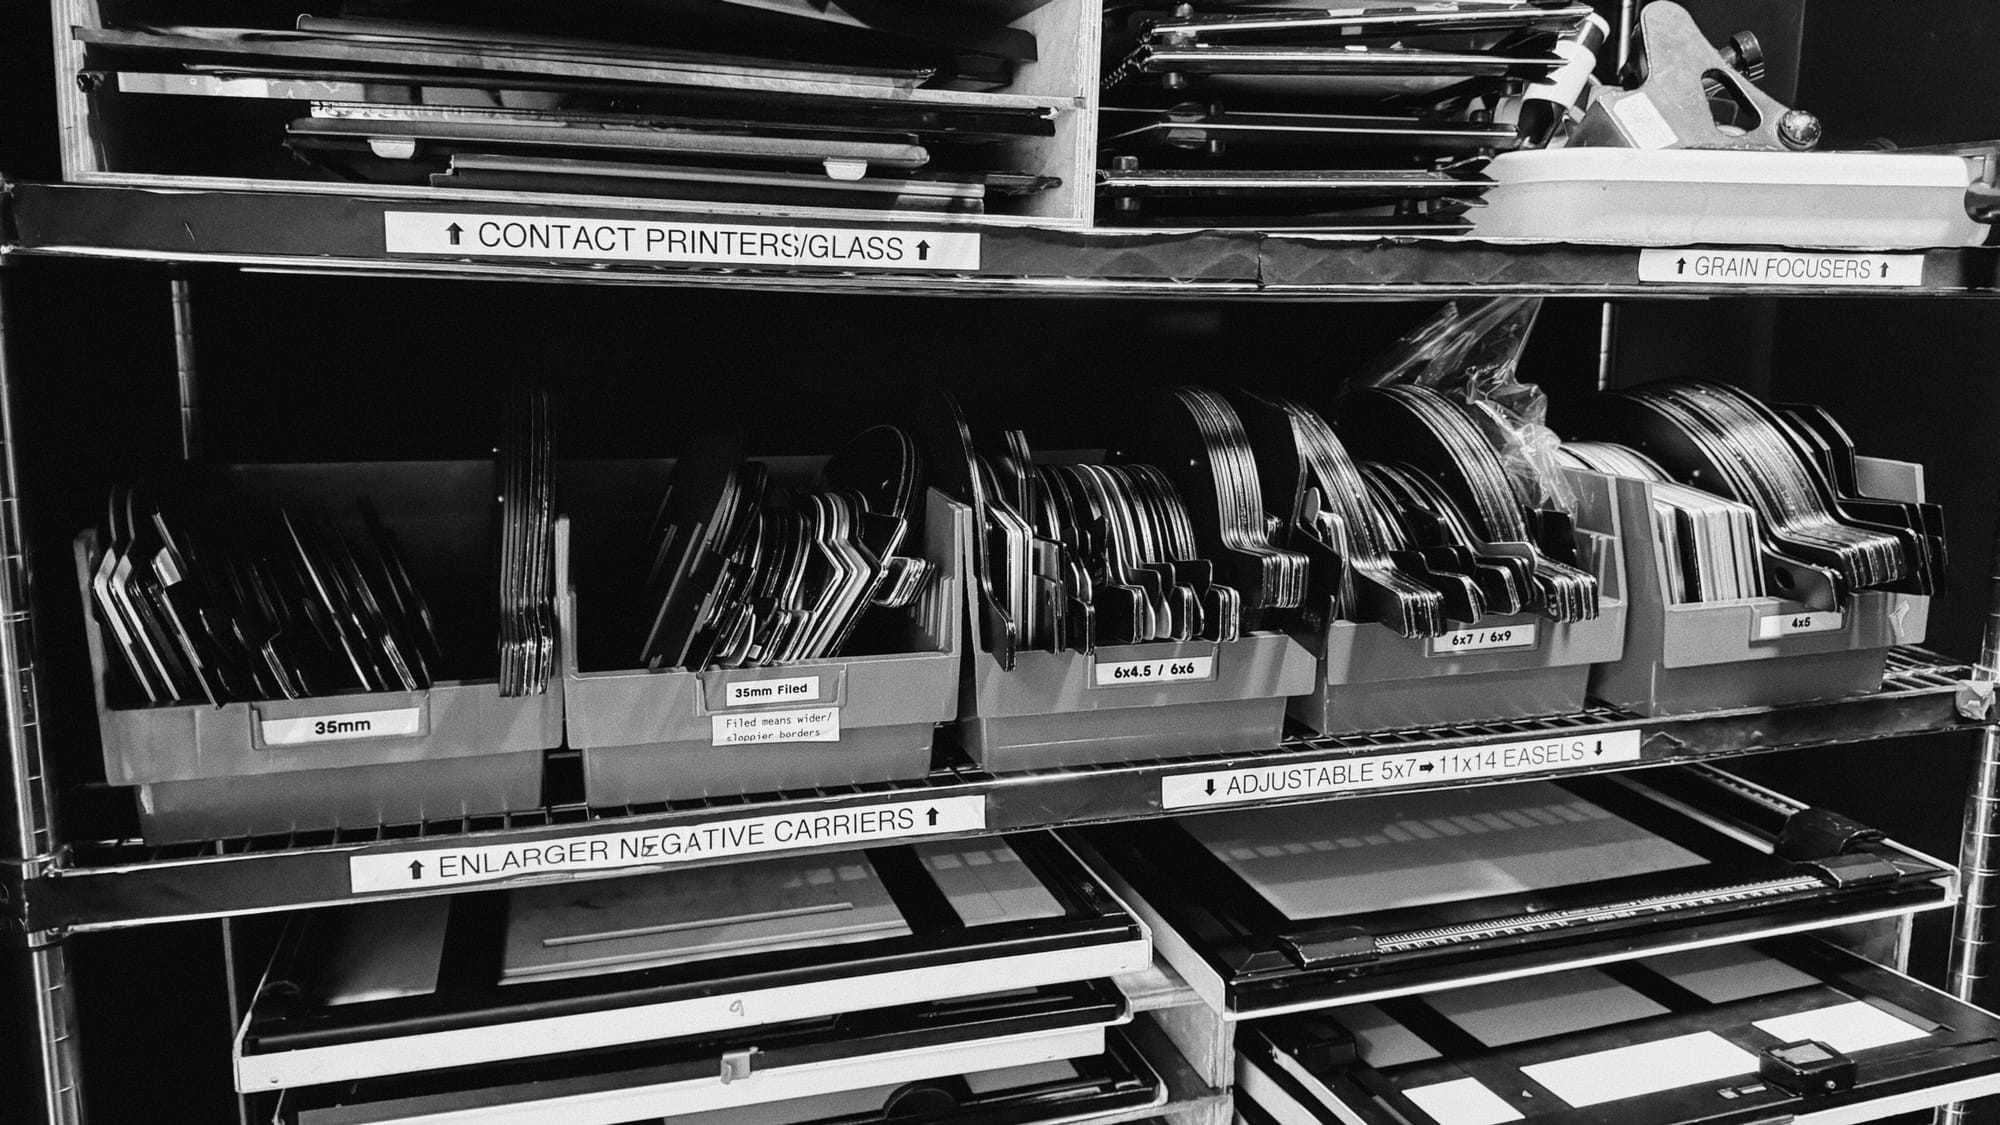
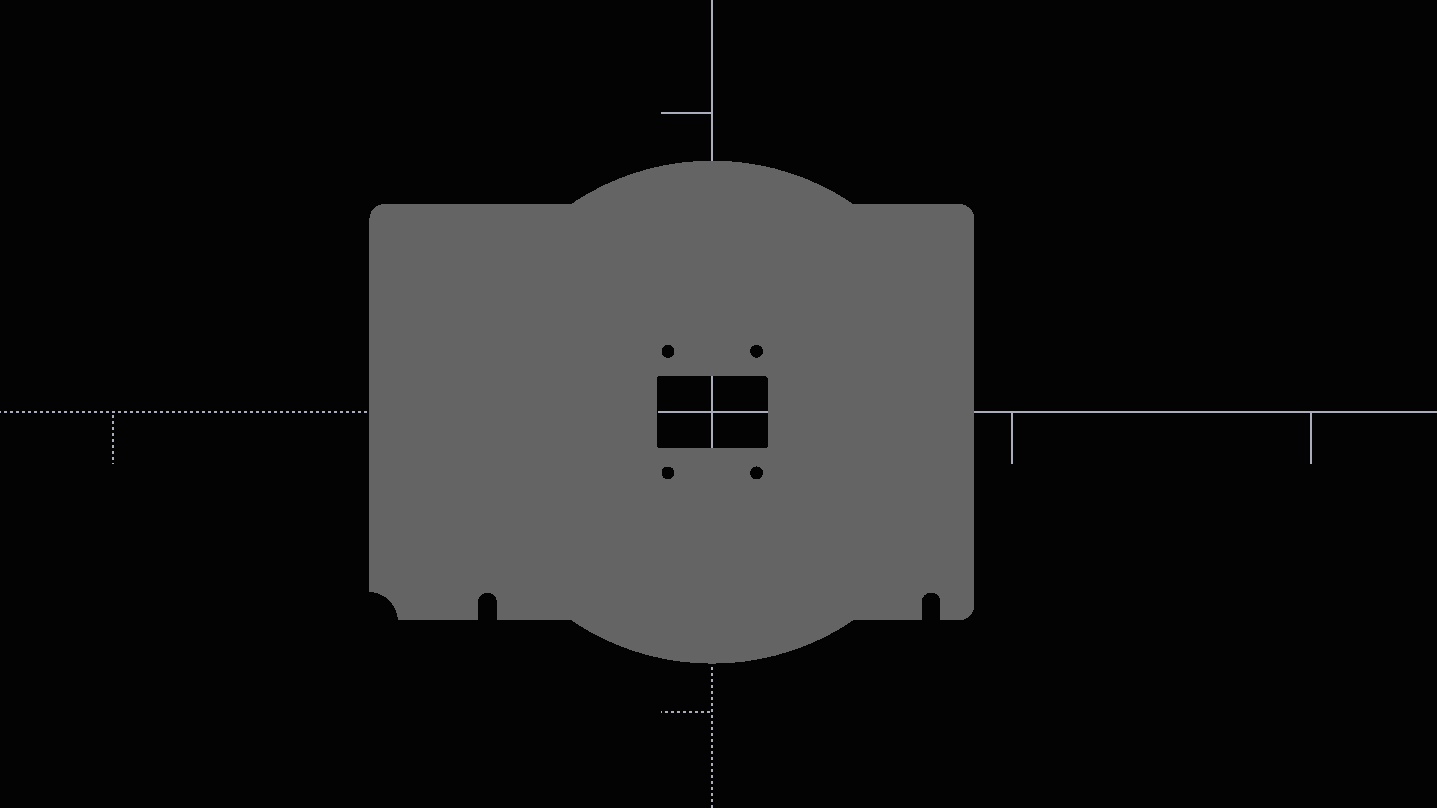
One of the most crucial and probably most overlooked pieces of equipment in the photo darkroom is a negative carrier. This is the thing that sandwiches your film flat, allows it to sit perfectly centered in the enlarger, and whose film opening shape enables/disables your enlarger projecting the film base and sprocket holes.
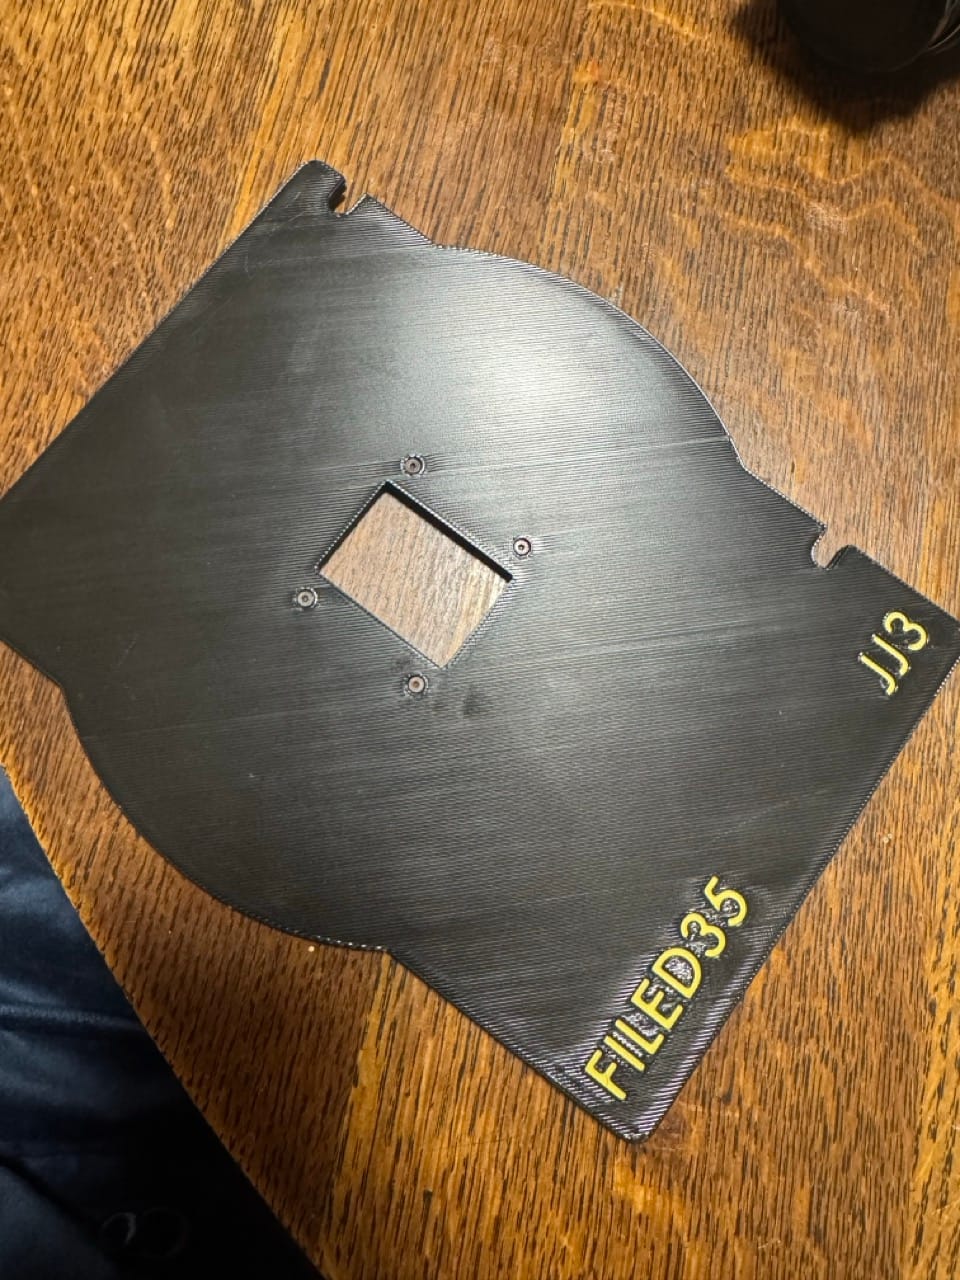
At the Photo Center, we have an outrageous number of these things. But it never feels like enough! A lot of our members prefer to use "filed" carriers. That is, carriers whose film opening has been literally filed away to show more of the film base or sprocket holes. This is often to enable the full use of the negative's frame size, get "sloppy borders", or allow for black borders to be printed in conjunction with precise enlarger easel blade placement.
We started numbering the filed 35mm carriers so that people can find their favorites, as they are all filed differently from each other; some have a much wider opening, and some only a sliver was removed. When we have a day with a decent number of printing people in the darkroom, some people's favorite carriers are in use by others. Commonly heard around the darkroom on these busy days are phrases such as "damn, where's filed #7?", "who is using filed #7??", and "I wish you had more carriers like #7".
And so, we have a problem: we have a lot of carriers, but we don't have enough of the right carrier that people want... and people want specific opening sizes... for all the different types of film and negative sizes.
The root of the problem: first-party negative carriers available for sale are usually kind of expensive, and are often used and dinged up. I don't want to discredit the amount of designing and engineering that went into these items, as I'm sure the designers of enlargers agonized over how these things should be made. But in principle, these carriers are just machined metal with a few pieces screwed in. Once the design is made and the tooling is created and a return on investment is reached, there's not really much keeping these things as expensive as they were/are.
The Photo Center simply doesn't have enough cash to throw around at this issue. We're run by the city government, and our budget is mostly focused on staff and maintaining the equipment we already have. We're fortunate that people donate old darkroom equipment to us, and sometimes we get negative carriers! But often they aren't filed and are usually regular 35mm or 6x6 medium format carriers.
Ancient problems don't always require modern solutions, but our lack of specific carriers problem can absolutely be solved relatively cheaply with a 3D printer. You know, once you account for the upfront cost of the printer and plastic.
A few Photo Center members purchased custom 3D printed negative carriers on eBay/Etsy so they don't have to worry about searching through our stock to find their favorite carrier. These things are really well made, and have nice labels designed into them. They're functionally identical to the original carriers, save for the fact that they're made out of plastic and much lighter. The seller offers a variety of sizes, even letting you contact them to get specific types of carriers made.
This opened my eyes to how easy this problem can be solved with a 3D printer. I've been asking, pleading, the higher-ups at the Photo Center to acquire a 3D printer for the space to use to print all sorts of things, as replacement parts for our other equipment can be expensive too, but again, budget is an issue. I decided to take the initiative to just start printing these things for myself with my own printer at home to skip the middleman of the eBay seller.
Parametric Printing
Parametrically printing prints to make darkroom prints
Originally, I looked around for existing designs on Printables and Thingiverse. While there are some great models on there, including some very cool redesigns of the carriers to better fit the 3D printing paradigm and its inherent limitations, I didn't find many that would make it relatively easy for me to modify into my own custom sized carriers. Digging around for carriers and other models I wanted to print though, I did find a few models that were designed with OpenSCAD, a programming language/3d design software that allows for entirely programmatic 3D CAD modeling.
OpenSCAD lets users define their models entirely in code, and allows for some really cool functionality, such as dynamic designs, a customizer interface, and even the ability to create the models in a web browser. Creating models in code makes it really easy to share the designs with others for modification, especially with version control software like git, as opposed to sharing a .STEP file that other parametric design apps can export to.
I've previously created models in a free web-based CAD modeler called OnShape, which is a really powerful tool and a great alternative to something like Fusion360, and a much better CAD experience than using FreeCAD (which is also great, free, and open source, but leaves a lot to be desired in the UX department). In OnShape, I designed a negative carrier-carrier for a Saunders-LPL 45xx enlarger, because one of the 4500s at the Photo Center didn't have one for some reason. I originally did also make some carriers in OnShape, but once I discovered OpenSCAD, I found that the paradigm of entirely code-based modeling was really fitting for this simple project, as it allowed for very quick iteration without having to dig through an interface that had far too many functions for what this project required. It also makes for a more readable and maintainable approach.
And so, after many iterations and fighting/loving the features and quirks of the OpenSCAD language, I created DarkroomSCAD, an open source repository of 3D printable darkroom/film photography items and parts. Right now, it only contains the OpenSCAD files for creating a custom negative carrier, a Patterson tank tube, and a thermometer holder for mixing vessels. In the future, I hope to include items like random enlarger parts, Patterson-compatible reels, and whatever else I find that I need in the darkroom. It uses an MIT license, so anyone can use this code however they want! Ideally, anyone who modifies the code will submit their changes to the repo for everyone else to use, but hey, they don't have to!
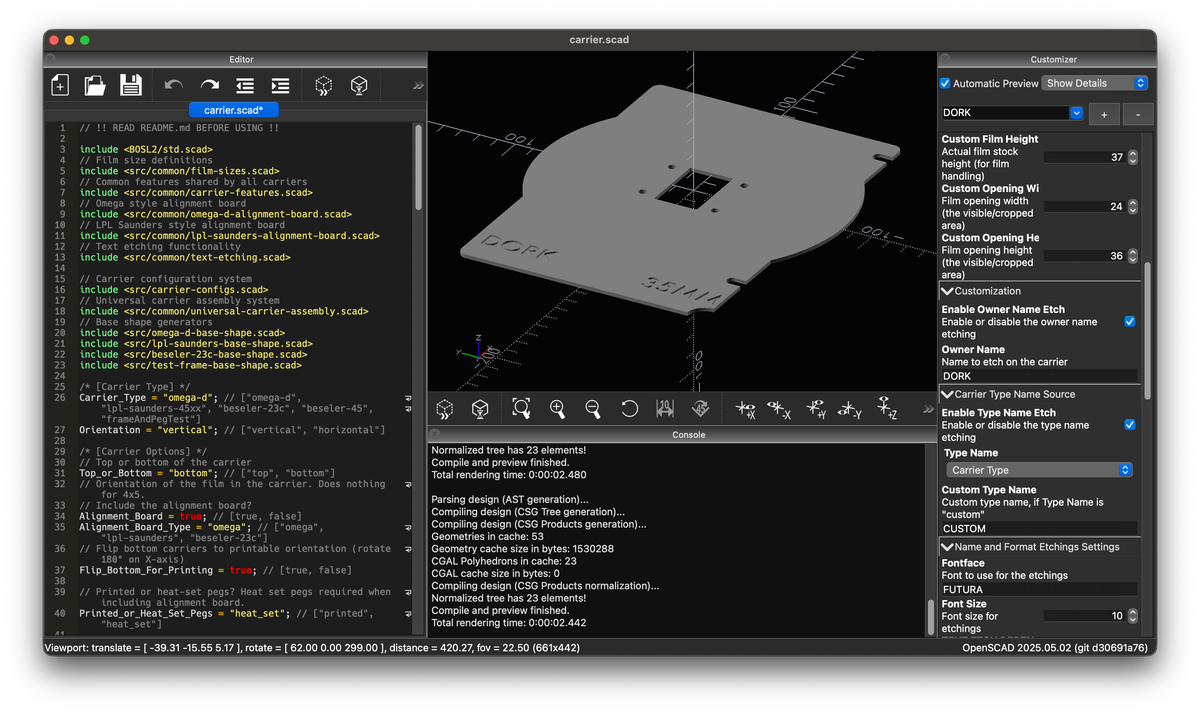
One of the primary features I implemented for the carrier was having one file control the output, while creating other files to create the base shapes and math. This means that the carrier.scad should be the only file that basic users need to touch, and it clearly states what its doing, and what each option does.
OpenSCAD provides a, ahem, "beautiful", customizer interface for any value that makes it easy to non-destructively change values with menus and text boxes instead of working in the code, as well as providing the means to save presets outside of the main carrier.scad file.

All of the film and frame sizes are defined in common/film-sizes.scad, so if users want to add their own custom values, they only need to edit this file and add the name to carrier.scad's 'Film_Format' values.
This setup allows one to make a carrier of their own custom design. You can have an Omega-D style carrier with a LPL-Saunders style alignment board, with your name and film size name printed into it, with any font you have installed on your system. It's pretty nifty to be able to precisely personalize a carrier like this. If you're at a community darkroom like the Photo Center, it's great to know your carrier will never get mixed up with the others!
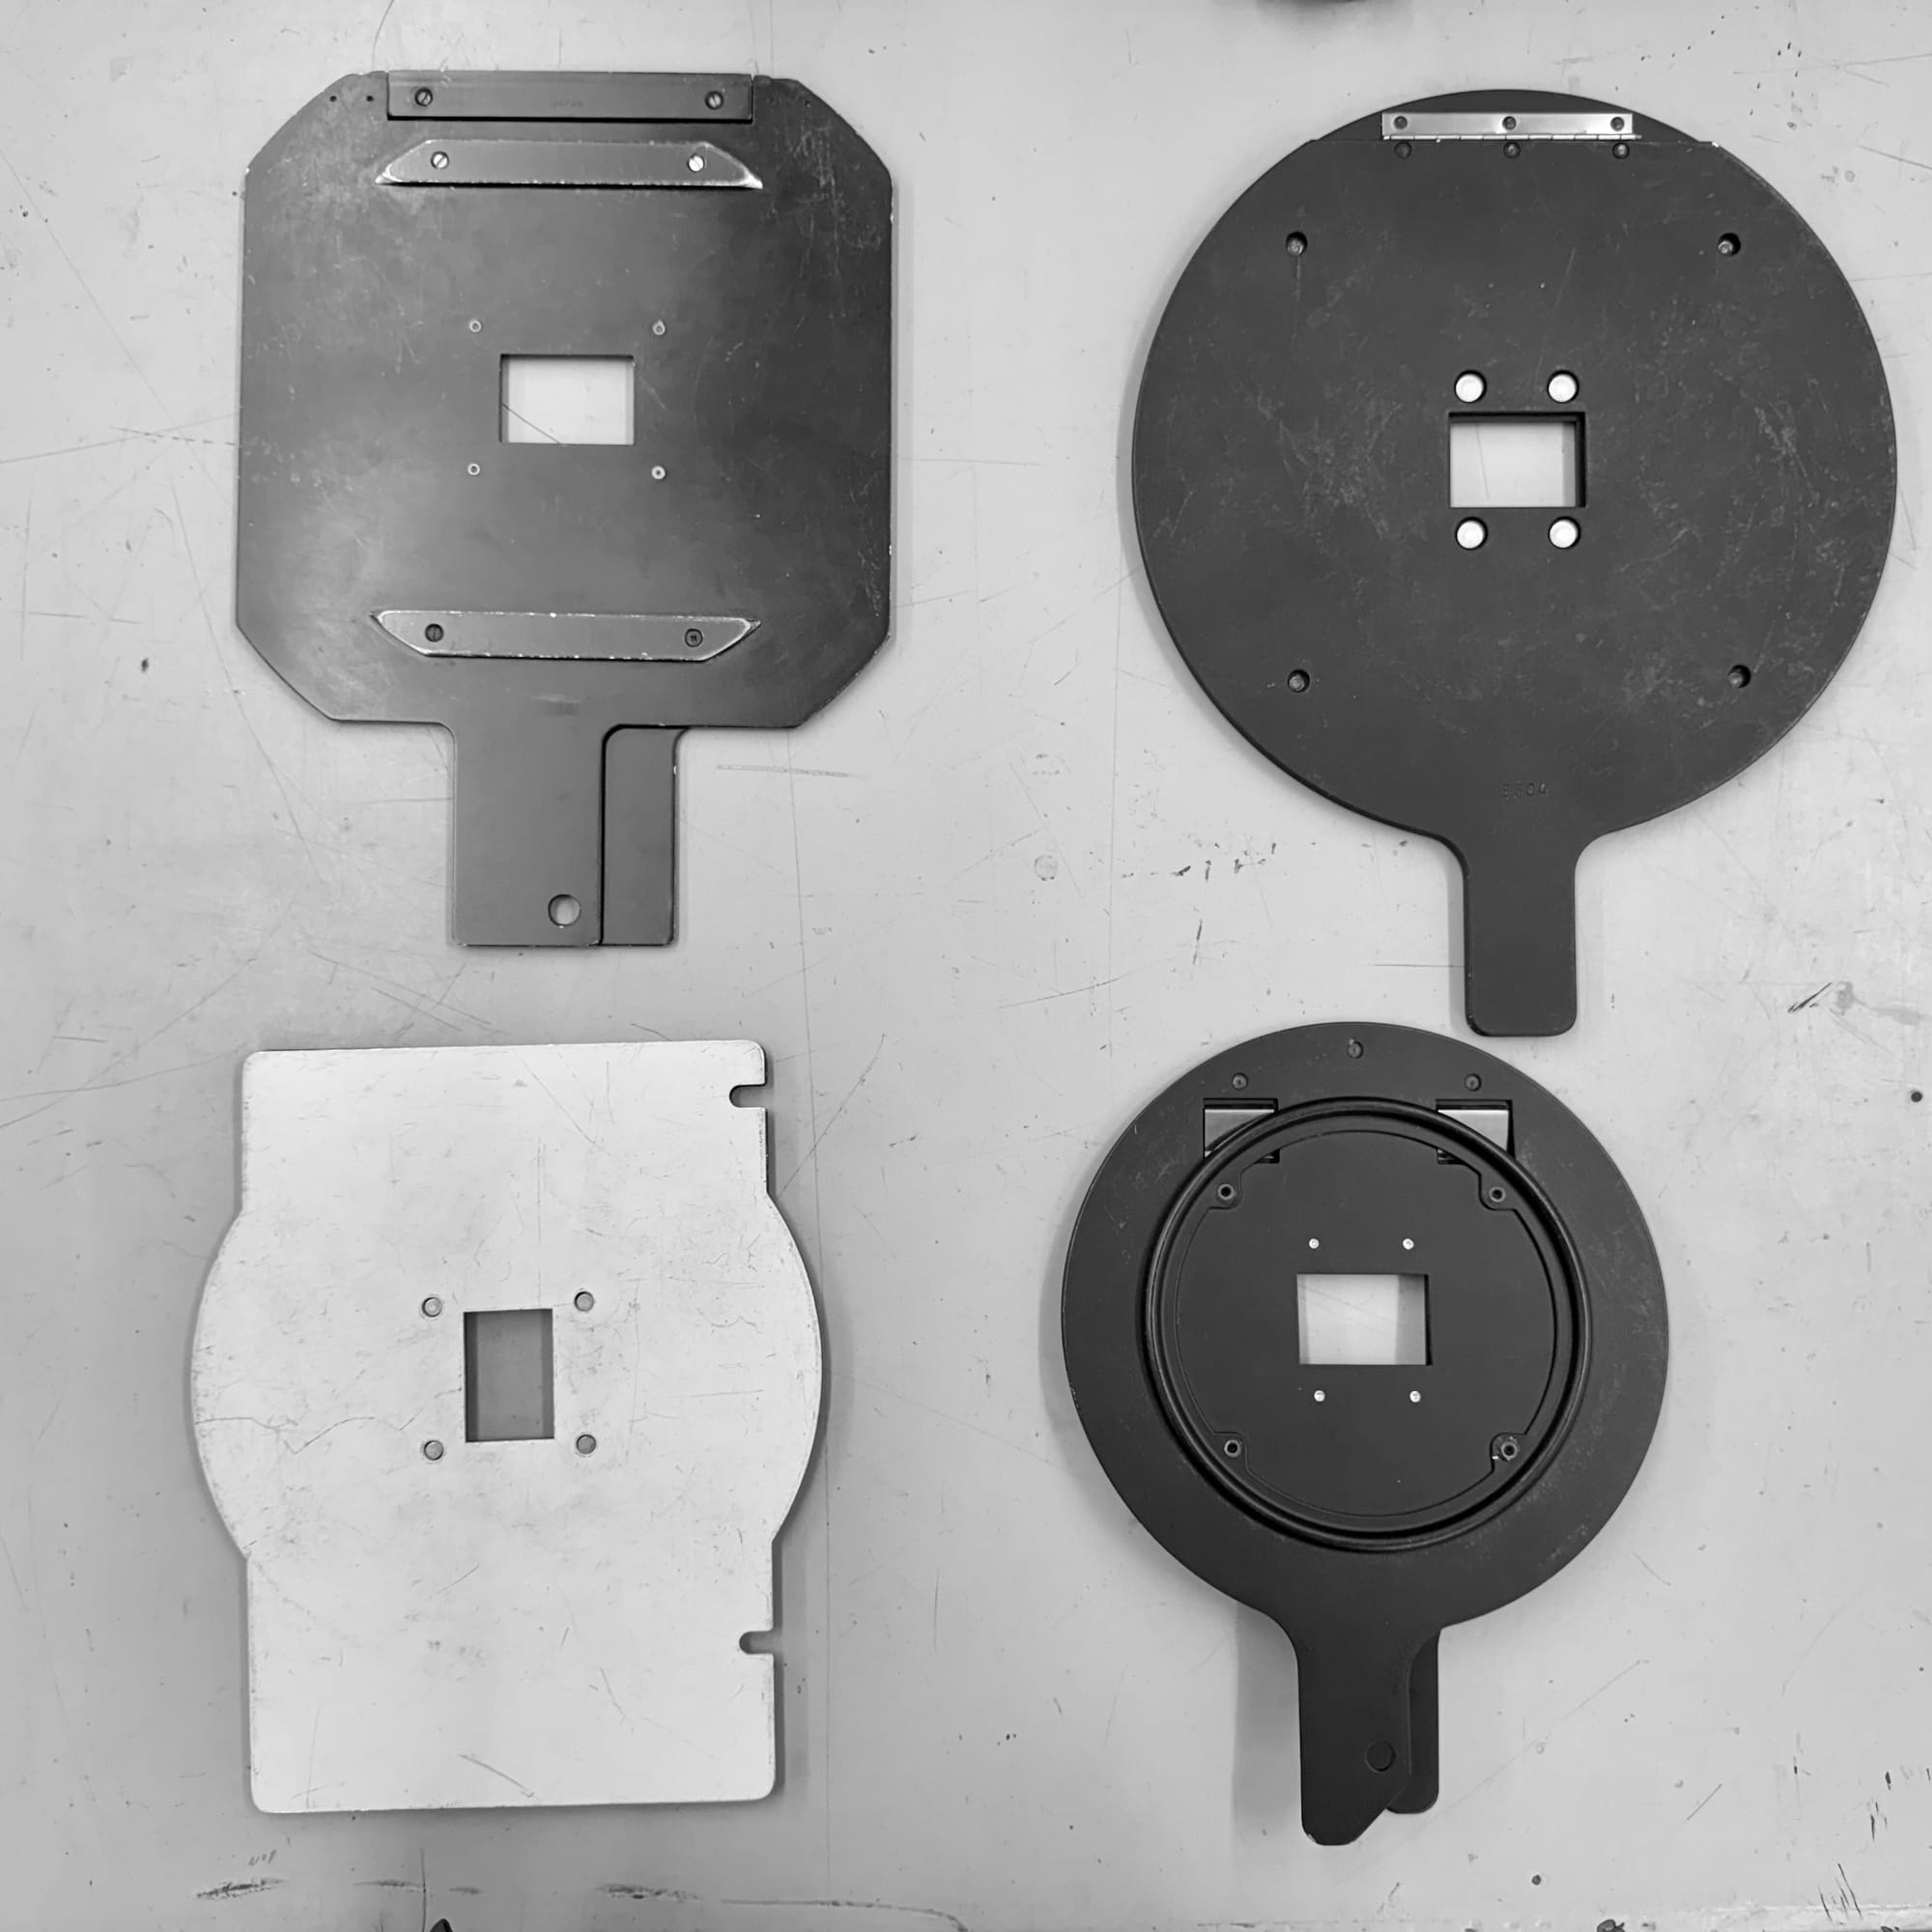
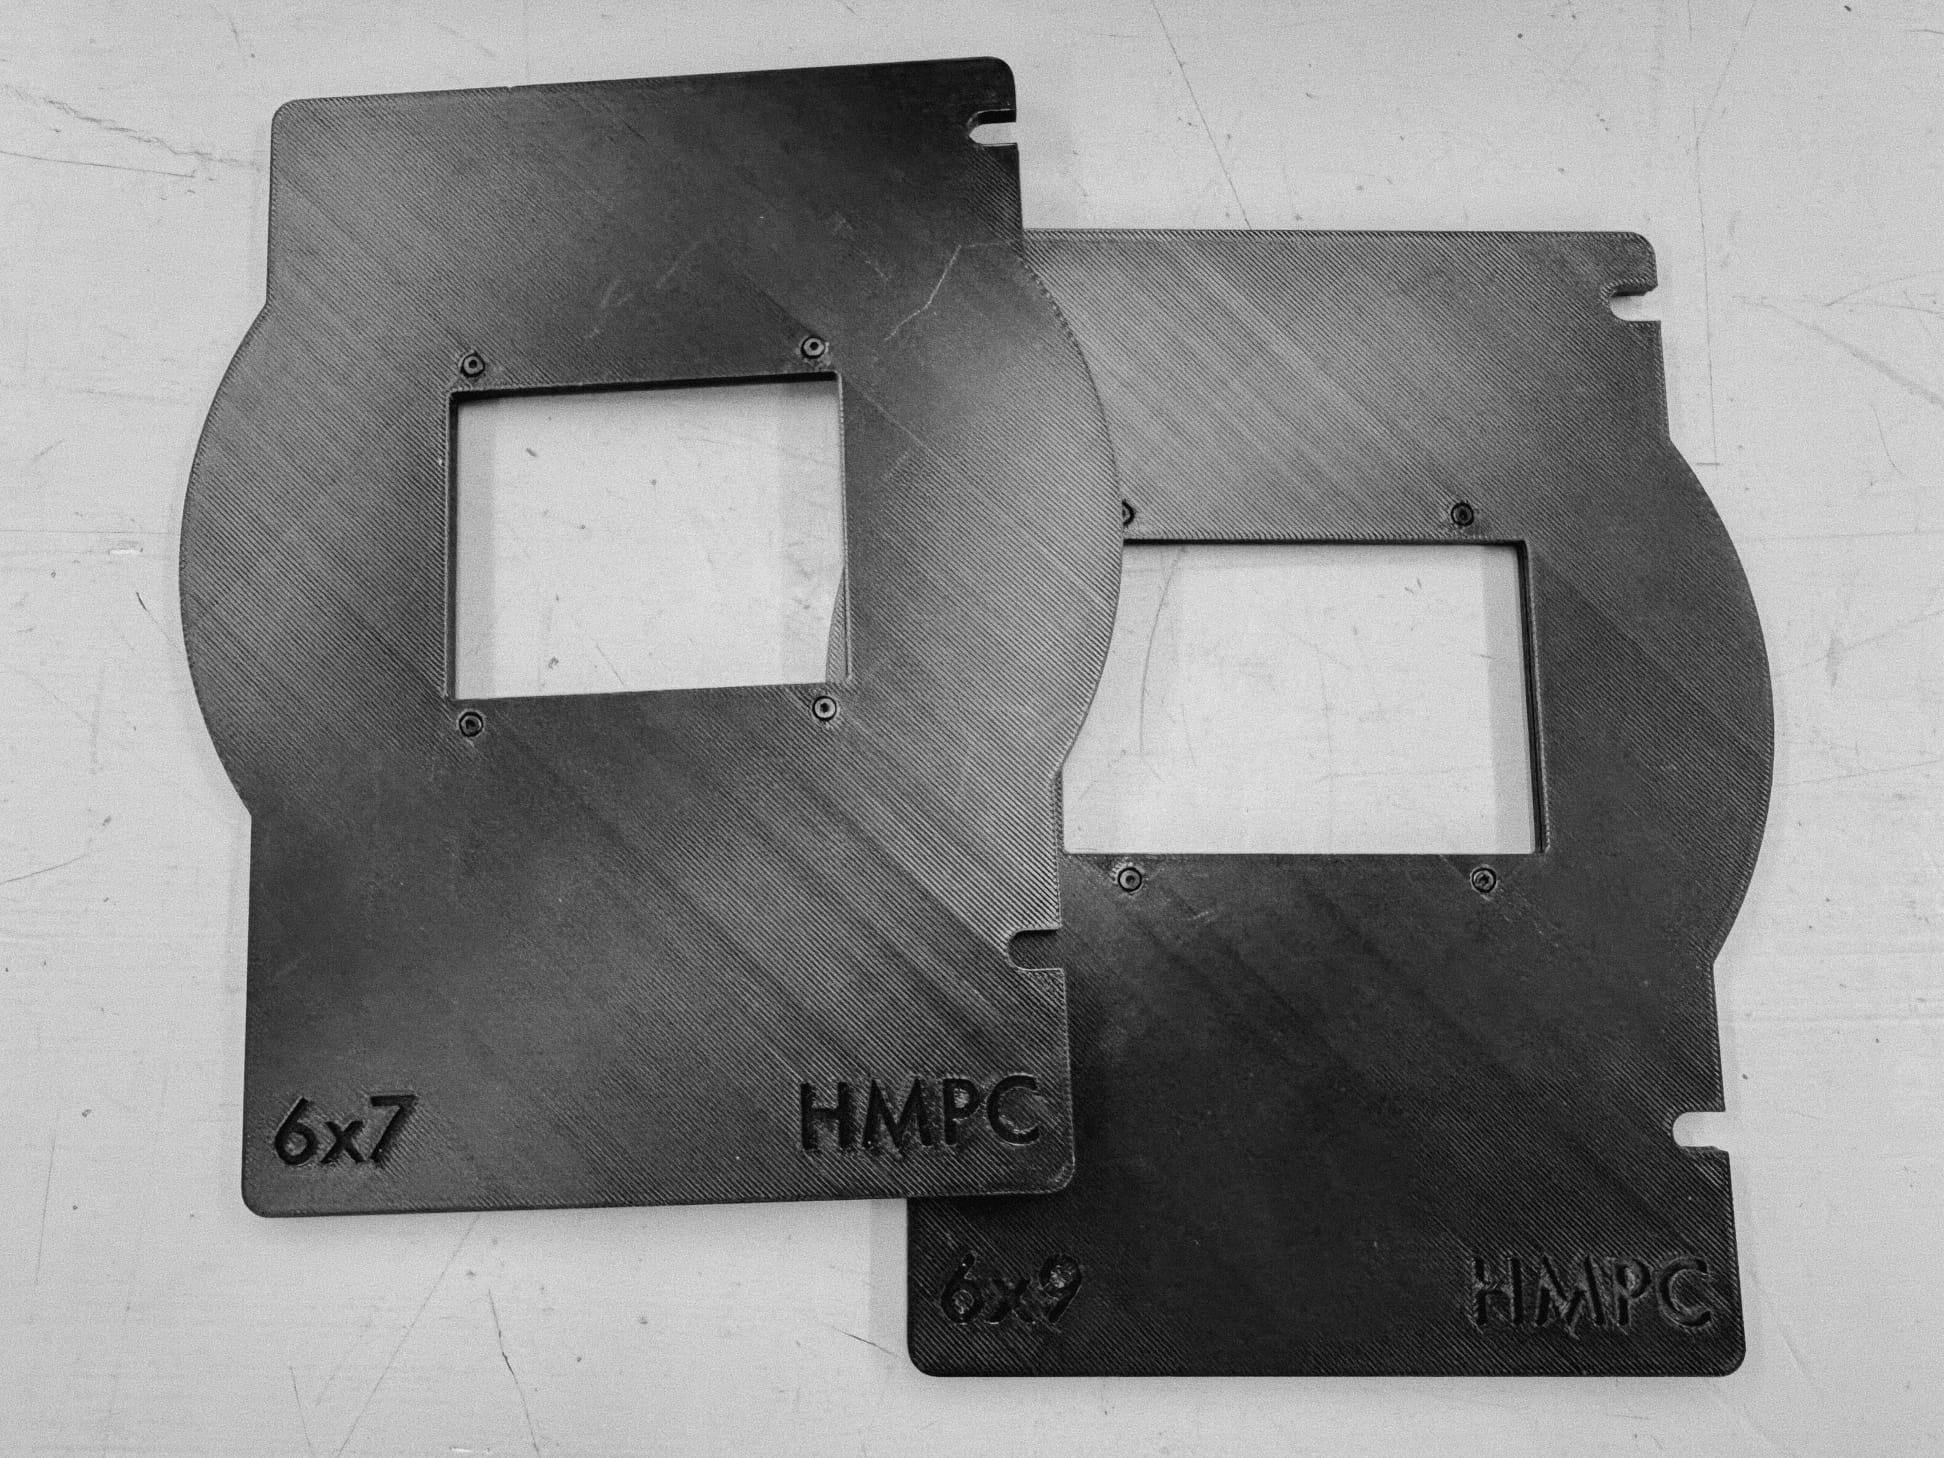
Once I finalized the design of the first carrier type, the Omega-D style carrier (which at the Photo Center we call the "universal carrier" because it also fits into LPL-Saunders 45xx enlargers), I printed out a few test prints, and then the first two usable designs were a 6x7 and 6x9 carrier.
Then, once I knew the designs worked as intended, I started printing them out for members. The first completed one was for my friend Jenna, and I tried an experiment where I colored the text with a yellow filament.
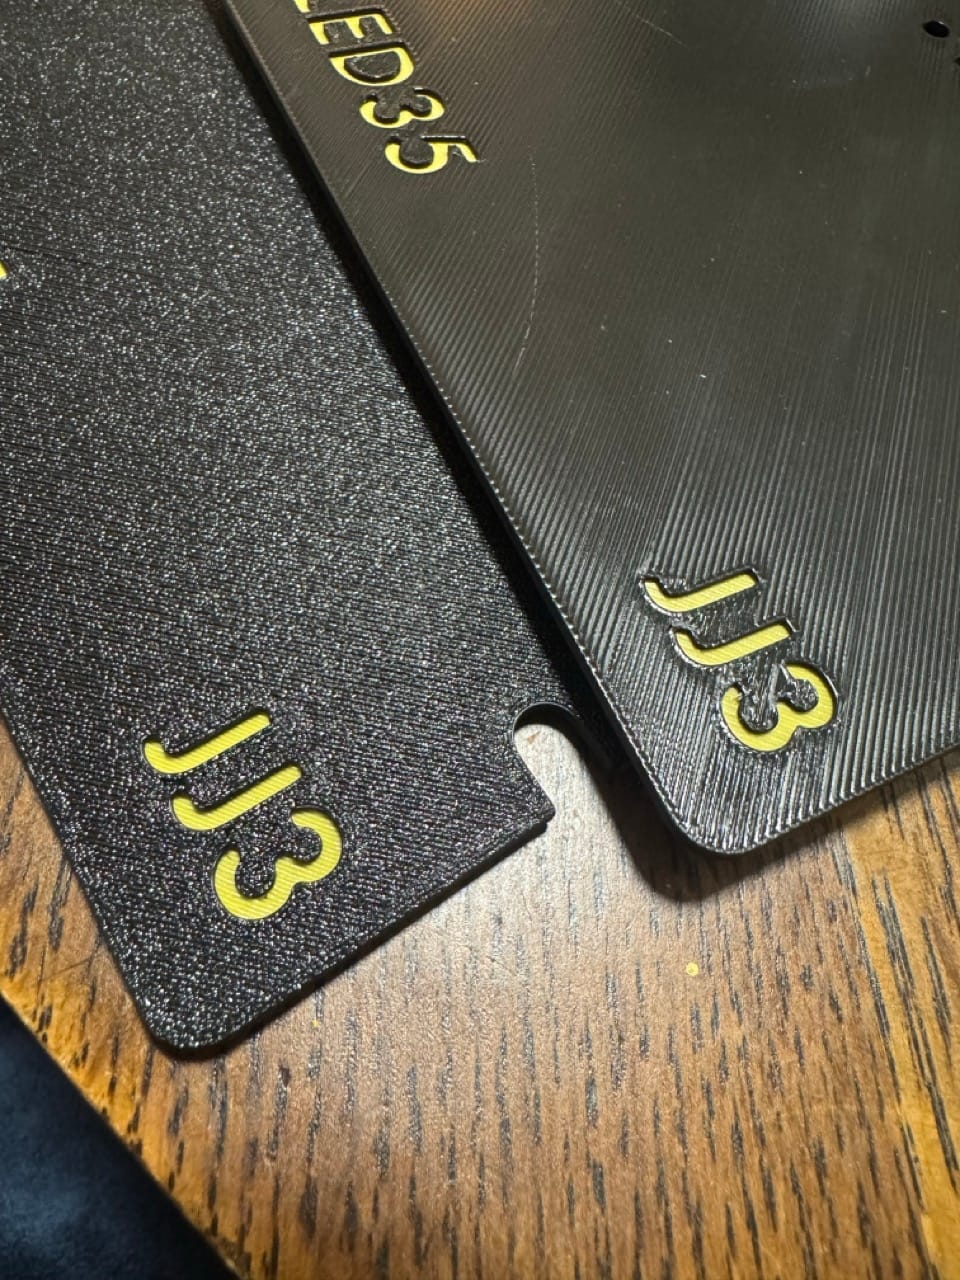
While I thought the result of the colored text looked great and super clean, it was rather annoying to implement with my single-hot-end-non-filament-switching printer, so I'm just going to default to not doing color changes.
One minor issue with my current printer setup is that I have a textured PEI sheet on the bed, which creates a sort of grainy pattern (which you can see on the left print in the above photo). I was worried this might scratch the negatives more than a flat PEI sheet would, but as far as I can tell, it has no impact on the film so long as you aren't literally sanding the film on the print with force.
So, I'm pretty pleased with the results. I've only actually printed the Omega-D style carriers, since those are the most popular carriers at the Photo Center, and it's much more filament-saving than the LPL style carrier. That being said, I don't see any reason the designs wouldn't work. I plan to add support for Beseler 45MX type carriers (which are huge circular designs) as well as potentially LPL-Saunders C66XX style carriers, which are sort of overcomplicated and harder to get right since they slot into the enlarger pretty snugly.
I've printed about 3 of these for members and friends and they all seem pretty happy with them! If you're a friend and you want one and have $20 to spare, feel free to reach out to me through whatever channels you have access to me through and I'll happily print one for you with your desired customizations. If you're not a friend, well, feel free to find someone to print these for you, since the files are available!
Once again, check out the GitHub repo if you want to make your own prints or investigate how the code works.
Feel free to reach out if you have any questions about this project!
Talk to you all soon,
-Aaron